A few months ago, I stumbled upon a video that led me into a rabbit hole. It resulted in a simple application that overlays a sudoku’s solution into the camera image of the puzzle. This post is about the process of getting to the end result.
It all started with the idea of writing a sudoku solver. The first version was ready relatively quickly, but there was one big problem: entering the starting position was slow and tedious. That’s when I realized that I could use the camera on my phone as the input device. I’ve never worked with image processing before, but it sounded like a good challenge, so I dived into it.
The case of the slow solver
As I mentioned before, I already had a working sudoku solver, but it was not ready for this kind of usage. It was a simple brute-force algorithm that tried every solution and discarded the incorrect ones.
The only optimization which was in place is that it only tried the currently possible numbers to every cell. This version solved the New York Times hard sudoku in about 3 seconds on my MacBook Pro, and that’s far from ideal, especially on a phone.
Luckily I already had an idea in mind. Instead of mindlessly trying every possible number in a cell, we can first fill in the ones where there’s only 1 possible number and run the solver on that version of the sudoku. This small change led to a considerable time saving as this version solved the same sudoku as before in ~300 ms.
In the beginning, I thought I’ll write the solver to work like a human would do, so I used sealed classes to store the 3 states of a cell (Empty, Filled, and PossibleNumbers). As the first version of the solver wasn’t using the third state and I wasn’t planning on using it, I changed the cell type to be a nullable integer, null being the empty state and any other value the filled state. Although it wasn’t as big of a time saver as the previous optimization, it also made the solver faster.
The third idea was that I could pre-calculate the coordinates for the 3x3 boxes, so we don’t have to do it on the fly. Even though the calculation was only a few steps, we had to do it for every cell in every iteration, which added up in the end, so this change was also a good idea.
Finally, I rewrote the code from functional to use old-school loops. This way, it was possible to break preemptively from them and save even more time. I’m sure it’s possible to write functional code that behaves the same, but I don’t know enough functional programming for that, so I chose this solution.
With these changes, I could shave off a huge amount of time, the final version solved the test puzzle in about 80 ms (and the easy puzzle only took ~12 ms). This is still more than I’d prefer, but I stopped here.
fun solve(): List<Sudoku> {
  val emptyCells = mutableListOf<Pair<Int, List<Int>>>()
    for (i in cells.indices) {
      if (cells[i] == null) {
        val possible = validNumbers(i / 9, i % 9)
        if (possible.isEmpty()) {
            // early return if this state is unsolvable
            return emptyList()
        }
        if (possible.size == 1) {
          // fill in if there's only one possible number
          return copyWithValue(i, possible[0]).solve()
        }
        emptyCells.add(Pair(i, possible))
      }
    }
    if (emptyCells.isEmpty()) {
            // no more emtpy cells -> we have found a solution
      return listOf(this)
    }
    return emptyCells[0].let { (cell, possible) ->
      possible.flatMap { n -> copyWithValue(cell, n).solve() }
    }
}
The camera feed
The next step was getting the camera feed. For this, I used CameraX, which makes the Android camera API usable. I still had problems setting it up because even though I used it only a month prior, it had a beta release since, and the API changed significantly, but after a short time, I could make it work.
Reading the numbers on the image
This was the part where I had the least experience. I’ve already heard about Google’s ML Kit, but I haven’t used it before. After some documentation reading, I found that it’s relatively easy to use with CameraX, and the Text Recognition API was exactly what I needed.
After setting it up, I was at a point where I had texts and their coordinates, but I still needed to turn it to a grid of numbers somehow.
Constructing the grid
I knew that the ideal solution would be using ML Kit to find the exact position of the grid on the image, but I wanted to make it work with the information I already had.
The original idea was to assume that most of the image is the sudoku itself. I know it’s not the best solution, but that was my first idea, so I went with it.
With this assumption, we can calculate the size of the cells and the middle of each cell. After that, we create a list of cells, where we store the calculated coordinates and the number which should go to that position (currently 0, which means that it’s empty).
val cellSize = bmp.width / 9f
(0..8).forEach { row ->
    (0..8).forEach { col ->
      val cx = col * cellSize + cellSize / 2
    val cy = row * cellSize + cellSize / 2
    fields.add(Field(cx, cy, 0))
    }
}
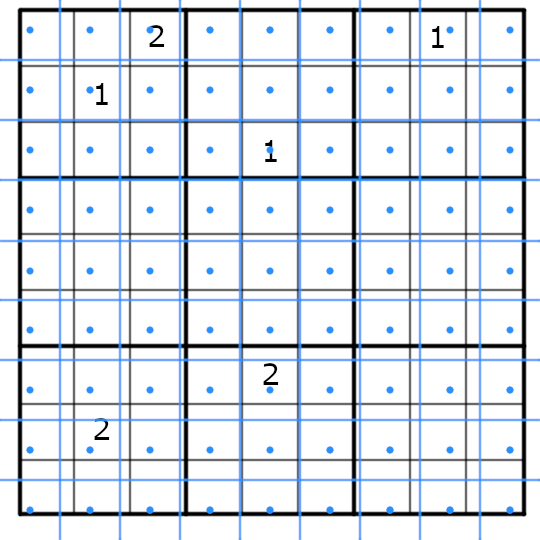
Here’s how the grid looks like according to our first estimate. It is clear that the cells are not placed correctly, but we’ll refine them later:
Adding the known digits
The next step is parsing the output of the text recognizer and adding the digits to our grid. For this, we will parse the recognized text line-by-line (which is a default supported feature of ML Kit). Every Text.Line object has two important things for us: the bounds of the text and the text itself.
First, we have to calculate the width of a single cell. This can be easily done by dividing the length of the line by the number of characters. After that, we can calculate the x coordinate for every number using its index in the found text and the cell width (val cx = box.left + index * fieldWidth + fieldWidth / 2). The y coordinate is simply the middle point between the top and the bottom of the bounds.
The last step is adding the number to our grid. For that, we have to find the cell with the nearest coordinate to our calculated value and update it with the new values.
text.textBlocks.forEach { block ->
    block.lines.forEach { line ->
      line.boundingBox?.let { box ->
        val fieldWidth = box.width().toFloat() / line.text.trimmedLength()
      line.text.trim().forEachIndexed { index, c ->
          val n = "$c".toIntOrNull()
        if (n != null) {
          val cx = box.left + index * fieldWidth + fieldWidth / 2
          val cy = box.top + (box.bottom - box.top) / 2f
          fields.indices.minBy { i ->
              val cell = fields[i]
            (cx - cell.centerX).pow(2) + (cy - cell.centerY).pow(2)
          }?.let { nearestIndex ->
              fields[nearestIndex] = Field(cx, cy, n)
          }
        }
      }
    }
  }
}
Here’s a simple visualization of the grid after this step:
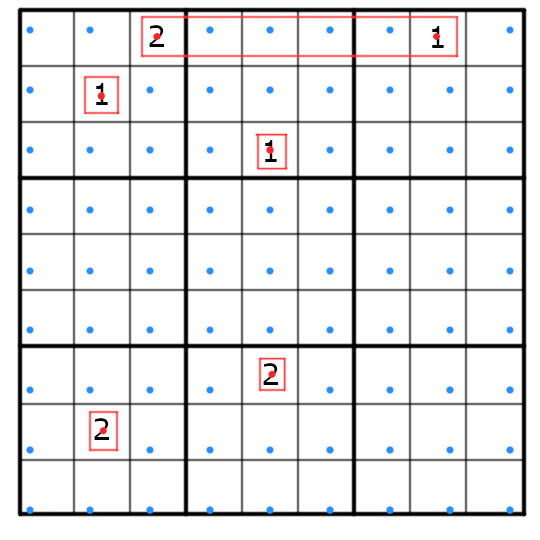
We can see that the numbers do not align with our previously calculated cells, but this is a good thing as we can use it to calculate the correct coordinates for the whole puzzle now.
Refining the grid
Now that we know where the real numbers are, we can calculate the correct bounds of the whole grid. For this, we first have to find the distance between two numbers in neighboring cells. We will do this by calculating the average x position of the known numbers in each column of the puzzle and finding the first and last column with at least one number in it. We now have the distance between two columns, and we know which columns are they, so we can easily calculate the width of a single cell.
Using the width, we can calculate what should be the coordinate of the first non-empty column, and the difference between that and the previously computed average will give us the left margin. We can calculate the right margin with the same concept, except we should use the last non-empty column.
The process is basically the same for the height of the cell and the top/bottom margin.
private fun calculateBounds(width: Int, height: Int, fields: List<Field>): RectF? {
    val cellXs = (0..8).map { col ->
      (0..8).mapNotNull { row ->
            val field = fields[row * 9 + col]
      if (field.value != 0) field.centerX else null
    }.average().toFloat()
  }
  val firstColX = cellXs.indexOfFirst { it != 0f && !it.isNaN() }
  val lastColX = cellXs.indexOfLast { it != 0f && !it.isNaN() }
  if (firstColX < 0 || lastColX < 0) return null
  val cellWidth = (cellXs[lastColX] - cellXs[firstColX]) / (lastColX - firstColX)
  val marginLeft = cellXs[firstColX] - firstColX * cellWidth - cellWidth / 2
  val marginRight = width - cellXs[lastColX] - ((8 - lastColX) * cellWidth) - cellWidth / 2

  // ... repeate with `y` coordinate to find marginTop & marginBottom

  return RectF(marginLeft, marginTop, width - marginRight, height - marginBottom)
}
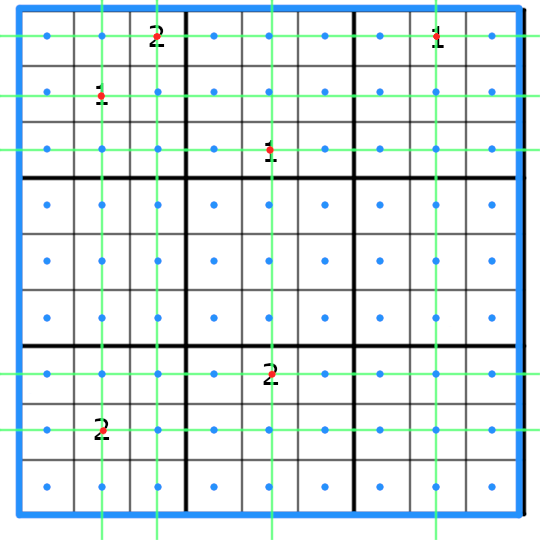
The last step for having the final coordinates of our cells is looping over the grid and updating every empty cell’s coordinates.
The final steps
Now that we have everything to display our result, there are only a few things left to do.
First of all, we have to check if the recognized numbers are really a sudoku or just some random numbers on the screen. There’s currently only a basic check: we count the numbers, and if there’s less than 17 of them, we discard everything as that’s the minimum number required to have a uniquely solvable sudoku.
If we decide we found a sudoku, we just have to pass it to our solver, render the solution to a bitmap and set it as an overlay over the camera image.
The application also caches the solved sudoku, so we don’t have to find the solution every frame.
Conclusion
This is the final version I settled with as a proof-of-concept, but I known there are problems with it. The assumption that the camera image only contains the sudoku itself makes using the program harder. I have an idea of how to solve this problem, but I’m currently not planning to improve on it.
The other big problem is the check for real sudokus. The current method can only find cases when there are not enough numbers but doesn’t filter when there’s a recognized number that should not be part of the puzzle. The idea that I have for finding the grid on the image might be a good solution; maybe sometimes I’ll explore it better in the future.
Finding a mathematical way to know where to render the solution was fun, but I don’t think it’s the best way to do it. I think it would be better to train a model that can tell the bounds of the puzzle and use that instead, but as I already mentioned, I wanted this to be a fun exercise and not just putting together things until I got the result I wanted.
Even though most of the code is part of this article, you might want to see the whole thing. In that case, you can find it on GitHub.
This post was originally published on kotlindevelopment.com. If you liked it please consider visiting and reading some other articles there.