Procedural generation is incredible. It is the key to writing games with endless content. Without it, Minecraft couldn’t have (nearly) infinite worlds with infinite terrain. Spelunky would only contain a few rooms, and we could learn the layout and enemy placement instead of learning the game mechanics. These are only a few examples, but there are a lot of games that use this mechanic for generating content.
In this article, I’d like to show you my way of generating a random dungeon that can be later used in a game.
Steps
The process consists of multiple steps, each one starting after the previous finished. Let’s have a look at them one-by-one and see how they work.
1. Generating rooms
This is the beginning of everything. We’re generating multiple random-sized rooms that later will be moved to their correct place and filtered.
For each room, we will generate a random width and height. To control the sizes, I introduced a minimum and maximum size setting. When we have the size of the room, we have to place them somewhere. For now, we will put all of them in the middle of our map and will later find their correct position.
I also needed some way of knowing when to stop generating new rooms. For this, I introduced a new setting that tells us the minimum area of the generated rooms. With this, we can stop generating new ones once the sum of their area reaches our given minimum.
private fun generateRooms() {
    while (rooms.sumOf { it.room.area() } < settings.minimumArea) {
        val width = rng.nextInt(settings.maxSize - settings.minSize + 1) + settings.minSize
        val height = rng.nextInt(settings.maxSize - settings.minSize + 1) + settings.minSize
        val left = (this.width - width) / 2f
        val top = (this.height - height) / 2f
        rooms.add(RoomState(Room(Vector(left, top), width, height), RoomState.State.Generated))
    }
}
2. Finding room placement
First, I select a random room, and we mark that as placed. After that, I iterate over all remaining ones and move them toward a random direction until they no longer intersect with any of the already placed rooms. I also added a margin for this to not end up with rooms that are too close to each other.
private fun moveRooms() {
    rooms[rng.nextInt(rooms.size)].state = RoomState.State.Placed

    while (rooms.any { it.state == RoomState.State.Generated }) {
        val movingRoom = rooms.first { it.state == RoomState.State.Generated }
        val direction = rng.nextDouble() * 2 * Math.PI
        val moveVector = Vector(cos(direction), sin(direction))
        var finalPlace = false
        while (!finalPlace) {
            movingRoom.room.topLeft = movingRoom.room.topLeft + moveVector
            finalPlace = rooms
                .filter { it.state == RoomState.State.Placed }
                .none { it.room.intersects(movingRoom.room, settings.roomMargin) }
        }
        movingRoom.state = RoomState.State.Placed
    }
}
3. Selecting rooms to keep
We have our rooms in the correct position now, but we still have too many of them. Let’s solve this issue by selecting a few to keep and removing the unnecessary ones. For this, I will calculate the average area of the rooms and only keep those larger than the average times a variable ratio.
private fun selectRooms() {
    val minArea = rooms.map { it.room.area() }.average() * settings.finalAreaRatio
    rooms.removeIf { it.room.area() < minArea }
}
4. Generating a spanning tree for the rooms
Next, we will generate a spanning tree of our rooms. We need this to connect our rooms with as few routes as possible.
To achieve this, we need a simple graph class capable of storing our edges and calculating the shortest path between two nodes (I’m using Dijkstra’s algorithm for this).
As a start, I calculate all possible edges between our rooms. We will have a complete graph with this, and we can now use that to calculate the spanning tree. We will calculate that by adding new edges until their number is less than the number of selected rooms minus one. We consider an edge a new one if there is currently no path between its two ends.
private fun generateSpanningTree() {
    val graph = Graph<Room>(emptyList())

    val allEdges = selectedRooms.mapIndexed { i, x ->
        selectedRooms.mapIndexed { j, y ->
            if (i < j) Pair(x.room, y.room) else null
        }.filterNotNull()
    }.flatten()

    while (graph.edges.size < selectedRooms.size - 1) {
        allEdges
            .filterNot { graph.isRouteAvailable(it.first, it.second) }
            .sortedBy { it.first.center.distance(it.second.center) }
            .take(1)
            .forEach { graph.addEdge(Graph.Edge(it.first, it.second)) }
    }
}
5. Selecting the entrance
With the spanning tree generated, we now have the basic structure of our dungeon. For the next step, let’s choose the room where the whole adventure begins. For this, I wanted to find the farthest room away from any leaf node.
private fun selectEntrance() {
    val graph = Graph(edges)
    selectedRooms.forEach { it.room.type = Room.RoomType.Room }
    selectedRooms.maxByOrNull { graph.branchDistance(it.room) }
        ?.let { it.room.type = Room.RoomType.Entrance }
}

private fun <T> Graph<T>.branchDistance(n: T, prev: T? = null): Int {
    val neighborCount = neighbors(n).size
    if ((prev == null && neighborCount > 1) || neighborCount > 2) {
        return 0
    }

    val next = neighbors(n).filterNot { it.otherEnd(n) == prev }.firstOrNull()?.otherEnd(n)
        ?: return 1

    return branchDistance(next, n) + 1
}
6. Quest room selection
For the next step, I’d like to find the room that will contain the quest objective. I thought that this room should be one of the leaves (that’s why I chose the farthest room as the entrance in the previous step), and it should be far from the entrance.
To make it more interesting, I decided to not simply use the farthest room from the entrance but to select a random one, weighted by its distance. I also introduced a factor that can be modified to specify how important the distance is.
private fun selectQuestObjective() {
    val graph = Graph(edges)
    val entrance = selectedRooms.first { it.room.type == Room.RoomType.Entrance }
    val distances = mutableListOf<Pair<RoomState, Int>>()

    selectedRooms
        .filter { it.room.type == Room.RoomType.Room && graph.neighbors(it.room).size == 1 }
        .forEach { roomState ->
            val distance = graph.shortestPath(entrance.room, roomState.room)
                ?.let { it.size - 1 } ?: 0
            val weight = settings.questObjectiveDistanceFactor.toDouble()
                .pow(distance.toDouble()).roundToInt()
            distances.add(Pair(roomState, weight))
        }
    val questObjective = distances.weightedRandom(rng)
    selectedRooms
        .first { it == questObjective}
        .room.type = Room.RoomType.QuestObjective
}
7. Generating corridors
Currently, the rooms are not connected; we just have a graph telling us which of them should be neighbors. To change this, let’s generate some corridors between them.
I iterated over the rooms and checked their neighbors one by one. For each neighbor, I had to find the direction they were in relative to the current room. After that, I knew which sides of the rooms were facing each other so I could check if there were any overlapping regions of those sides. I also added some margin to prevent the corridors from being generated in the room’s corner.
At this point, there were two possibilities: there is an overlap where I can put the corridor (red on the image), or there isn’t (blue on the image).
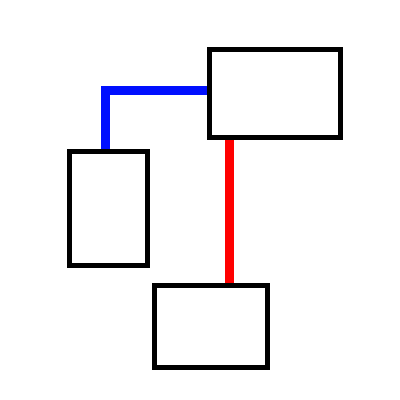
The first one is simple, just select a suitable location and add a corridor there.
The second one is more problematic. In this case, I had to find the side closest to the current room (top, in the example above) and choose a point there. Then I chose a point on the current room and added two separate corridors.
8. Converting to a tilemap
Now that we have everything generated, there’s only one thing left to do. We should convert our rooms and corridors into a more usable format.
First, I had to find the size of the map. This was an easy task, I just had to find the minimum and the maximum of every room’s x and y coordinate. Once I got that, I split the whole area into squares and looped over them. For every square, I checked if it intersects with any room or corridor, and if there was an intersection, I set the tile type accordingly.
private fun generateTileMap() {
    val minX = rooms.minOf { it.room.left }.roundToInt()
    val maxX = rooms.maxOf { it.room.right }.roundToInt()
    val minY = rooms.minOf { it.room.top }.roundToInt()
    val maxY = rooms.maxOf { it.room.bottom }.roundToInt()
    val tileMap = TileMap(maxX - minX, maxY - minY)

    for (i in 0 until (tileMap.width * tileMap.height)) {
        val x = i % tileMap.width
        val y = i / tileMap.width
        val tileLeft = (x + minX).toFloat()
        val tileTop = (y + minY).toFloat()

        val tileRect = RectF(tileLeft, tileTop, tileLeft + 1, tileTop + 1)
        val intersectedRoom = rooms.firstOrNull { it.room.getRect().intersect(tileRect) }
        val intersectedCorridor = corridors.firstOrNull { it.getRect().intersect(tileRect) }
        tileMap[x, y] = when {
            intersectedRoom != null -> when (intersectedRoom.room.type) {
                Room.RoomType.Room -> TileMap.TileType.Room
                Room.RoomType.Entrance -> TileMap.TileType.StartRoom
                Room.RoomType.QuestObjective -> TileMap.TileType.QuestRoom
            }
            intersectedCorridor != null -> TileMap.TileType.Corridor
            else -> TileMap.TileType.Void
        }
    }
}
Demo
Final Thoughts
Now that we’re done with the generation, there are a few things I wanted to mention.
You may have seen that I used a variable called rng multiple times during the examples. This is, of course, a random number generator that is initialized at the beginning and then used for every step. This way, we can set a seed to the generator, and we will always get the same end result.
The source code for this article is available on GitHub, but if you check it, you may see that it differs from the ones presented here. This is because that code is structured in a way that makes it easier to visualize the process, but that doesn’t change the theory behind this whole process, the end result will be the same in both versions.