IrisCTF has just ended, and since I was one of the participants, I decided to write a few thoughts about it, as well as write proper writeups for the challenges I managed to solve.
As a start, let’s go through the challenges by categories, and in the end, I’ll add some personal thoughts.
Cryptography
Baby Charge
For this challenge, we got access to the source code for a custom cipher. At startup, it generated a random key and nonce, and after that, there were two options for the user:
- encrypt our input
- print the encrypted flag
While reading through the source, the first thing I realized and seemed useful later was the state handling. It used the key and nonce generated during the app start to create the first state, but after that, once we used up all of the bytes in the state, it generated a new one. However, this new state was completely deterministic, which meant that all we had to do was to determine the initial state, and then we could generate all subsequent ones. We could then use those states to find our flag.
The steps were fairly easy after this idea:
- determine the initial state by providing a well-crafted input
- get the encrypted flag
- determine the state that was used for the flag encryption
- decrypt the flag
Let’s start with getting the initial state. Reading through the code, we could see, that the encryption itself is a simple, byte-by-byte xor operation with a buffer, that initially contains the state. Once this buffer runs out of bytes to use for the operation, it will generate a new state. We could also see, that the buffer (and with that the state) was 64 bytes long. This meant, that all we had to do was to provide 64 0 bytes as an input, and the “encrypted” output would be the initial state.
Next, we just needed to tell the application to generate the encrypted flag for us. Since we used a 64-byte input in the previous step, this round of encryption already used the new state, which we could now determine from the initial one.
For the last two steps, we could use mostly the same code that was used for the encryption itself. You can find the final script that I used to get the flag here.
Accessible Sesamum Indicum
This challenge was easier than the previous one. Once we looked at the code, we could see, that we have to enter a 4-digit PIN code on a 16-digit “input panel”, and then repeat it 15 times. There were a few noteworthy details needed to solve this challenge:
- the PIN was rolling (so once you entered the first 4 digits, every subsequent digit was checked one by one using the last 4 entered digits)
- the max number of digits that we were allowed to enter before we failed was
65536 - less important, but makes implementation a bit easier: we could enter any number of digits at once
Some people may already know it, but I needed some searching to find the perfect solution for this task: the de Bruijn sequence. Shortly: it is a sequence where every possible string of a given length occurs exactly once. This is all the information needed to solve this challenge, there’s only one line of code that’s useful here:
pwn.cyclic_gen("0123456789abcdef", 4).get()
Not too surprisingly, this string is exactly 65536 characters long, so we just have to provide it 16 times to the app, and we’ll get the flag. For the full source of the script that I used for this challenge, click here.
Web
What’s My Password?
This was a fairly straightforward SQL injection challenge, and since we had access to the source, we could easily craft our query without any guessing.
Thanks to the setup.sql file, we already knew the username of our target, all we needed was to find a way of getting their password. For that we only needed two small pieces of information:
- the query used for checking the user credentials is constructed with
fmt.Sprintf - after a successful login, the backend will respond with both username and password
Knowing this, we just have to create a good injection that logs in to the user we need. Once we’re logged in we can just check the network traffic to get the flag. The only hard part about the injection is that if we try the standard ' or 1==1 -- , the backend will log us into the account of the first user in the database, who is not our target. To prevent this, we have to make sure to only return 1 result with our query. We can easily achieve this by providing an incorrect username/password combination and using union to append our target account to the result list.
-- paste this in the password field
" union select * from users where username = "skat" --
Mokersee
For this challenge, we get access to a website that displays cat images. It also informs us, that we can embed the images to our site, and mentions an optional filter parameter that could be used to apply filters to the image.
Once we download the source code to the server, we can find that there are multiple images available, and we’re looking for the one named flagmoker. Unfortunately, it’s marked as private, so when we try to request it, the server will just respond with an error message instead.
As a first idea, I tried looking into some kind of RCE in the code. The obvious parts were json.loads and the filters themselves, but I couldn’t find anything, so I gave up.
After that, I had another idea: what if I could read the image pixel-by-pixel somehow, and construct the image that way? In the beginning, I just started playing with the filters to see, if I can get to an image that contains only one pixel from the original one. After some trial and error, I came up with the following filter chain:
[
    {"filter": "gamma", "args": [0.001]},
    {"filter": "resize", "args": [[128, 96]]},
    {"filter": "warp", "args": [[[1, 0, 200], [0, 1, 300], [0, 0, 100]]]},
    {"filter": "resize", "args": [[1, 1]]}
]
Let’s take a line-by-line look at what this achieves:
- apply a gamma filter with a low value: in the resulting image the background turns almost completely white, while the flag text stays red
- resize the image to a smaller size: just for convenience. If we manage later to read the image pixel-by-pixel, this will save us a lot of requests
- apply a transformation matrix to the image: this is where the magic happens. We’re upscaling and translating the image at the same time. In the example above, we’re translating it by
2pixels in thexdirection and3pixels in theydirection. At the same time, we’re also upscaling the image to100x(that’s why we have to specify200and300as translation). This will result in an image that is (almost) completely white or red, and the color will depend on the pixel we specified during translation. - resize the image to be 1x1
With that, we have a way of getting the color of any pixel of the image, but we still need a way of accessing this information about the private image. Luckily, there’s a logical error in the code, that we could use here. The check for the private flag only happens after the filters are applied. I also discovered during the testing, that there’s no proper error handling, so if we get an exception during the execution we will get an Internal Server Error, instead of the usual Not for public consumption. message.
This meant, that if we managed to come up with a filter, that throws an exception for one color, but not for the other one, we could extract 1-bit of information about every pixel, and that’s enough for us to get the flag.
At this point, I went back to check the source code of the filters, and I finally found this piece of code:
# original: https://github.com/scikit-image/scikit-image/blob/0e35d8040d0b0bb409de41f3c0f024f941e09d8a/skimage/exposure/exposure.py#L626
def adjust_gamma(image, gamma=1, gain=1):
    if gamma < 0:
        raise ValueError("Gamma should be a non-negative real number.")

    dtype = image.dtype.type

    if dtype is np.uint8:
        out = _adjust_gamma_u8(image, gamma, gain)
    else:
        _assert_non_negative(image)

        scale = float(dtype_limits(image, True)[1]
                      - dtype_limits(image, True)[0])

        out = (((image / scale) ** gamma) * scale * gain).astype(dtype)

    return out
The important part here is the assertion (_assert_non_negative(image)). This method checks if any color values are negative, and if yes, it throws an exception. All that was left, was to find a way of making it fail the assertion for one color, but pass for the other one. Luckily, we have a filter available, that does exactly that.
According to the documentation of the intensity filter, it returns image after stretching or shrinking its intensity levels. We can specify an input and an output range, and it will convert the image between them. Right now, we’re using a range of (0..1), but let’s see what happens, if we change it to (-1..1):
- high (
>0.5) color values will still be between0and1 - low (
<0.5) color values will be between-1and0
What does it mean in our case? We have 2 colors that we’re working with. One of them is white, where every value is close to 1, so after stretching the levels, they will still be positive. The other color is red (0xFF0000). In this case, only the red value is higher than 0.5, but green and blue are close to 0, so they’ll become negative, and this is exactly what we wanted.
With this knowledge, we can add the two new filters to our chain to end up with this final one:
[
    {"filter": "gamma", "args": [0.001]},
    {"filter": "resize", "args": [[128,96]]},
    {"filter": "warp", "args": [[[1,0,x],[0,1,y],[0,0,100]]]},
    {"filter": "resize", "args": [[1,1]]},
    {"filter": "intensity", "args": [[0,1],[-1,1]]},
    {"filter": "gamma","args": []}
]
After testing this filter, we can see, that the backend will have different responses based on the color of the specified pixel (status code 200 for white and 500 for red). All that’s left is getting this 1-bit information for each pixel, and reconstructing the flag. For that, I used the fuzzer built into OWASP ZAP (fuzz x and y with Numberzz payload, start: 0, step: 100, end: 9600 for x and 12800 for y).
Once it was done, I exported the results, wrote a small script to parse the csv and construct our output image, and submitted the flag.
import csv
import numpy as np
from PIL import Image

image = np.zeros((128, 96, 3), dtype=np.uint8)
with open('fuzz.csv') as csvfile:
    reader = csv.reader(csvfile)
    reader.__next__()
    reader.__next__()
    for row in reader:
        coords = eval(row[14])
        x = coords[0] // 100
        y = coords[1] // 100
        code = int(row[5])
        if x < 96 and y < 128 and int(row[5]) == 500:
            image[y][x][0] = 255

image = Image.fromarray(image, 'RGB')
image.save('flagmoker.png')
Forensics
Not Just Media
For this challenge we got an mkv file to work with. After opening it, the first thing we notice is the subtitle being Chinese. This should be suspicious on its own, but matched with the challenge description it’s a sure sign that it has something to do with the flag. Let’s have a deeper look at the video file itself. For that, we can use ffmpeg with the following command: ffmpeg -i chal.mkv
Input #0, matroska,webm, from 'chal.mkv':
  Metadata:
    encoder         : libebml v1.4.4 + libmatroska v1.7.1
    creation_time   : 2024-01-05T00:28:38.000000Z
    MOVIE/ENCODER   : Lavf60.3.100
  Duration: 00:02:11.67, start: 0.000000, bitrate: 1560 kb/s
  Stream #0:0: Video: h264 (High), yuvj420p(pc, bt470bg/unknown/unknown, progressive), 1280x720 [SAR 1:1 DAR 16:9], 60 fps, 60 tbr, 1k tbn (default)
    Metadata:
      BPS             : 953551
      DURATION        : 00:02:11.651000000
      NUMBER_OF_FRAMES: 7896
      NUMBER_OF_BYTES : 15691995
      _STATISTICS_WRITING_APP: mkvmerge v80.0 ('Roundabout') 64-bit
      _STATISTICS_WRITING_DATE_UTC: 2024-01-05 00:28:38
      _STATISTICS_TAGS: BPS DURATION NUMBER_OF_FRAMES NUMBER_OF_BYTES
  Stream #0:1: Audio: aac (LC), 44100 Hz, stereo, fltp (default)
    Metadata:
      BPS             : 131516
      DURATION        : 00:02:11.587000000
      NUMBER_OF_FRAMES: 5667
      NUMBER_OF_BYTES : 2163239
      _STATISTICS_WRITING_APP: mkvmerge v80.0 ('Roundabout') 64-bit
      _STATISTICS_WRITING_DATE_UTC: 2024-01-05 00:28:38
      _STATISTICS_TAGS: BPS DURATION NUMBER_OF_FRAMES NUMBER_OF_BYTES
  Stream #0:2: Subtitle: ass (default) (forced)
    Metadata:
      BPS             : 6
      DURATION        : 00:02:10.000000000
      NUMBER_OF_FRAMES: 1
      NUMBER_OF_BYTES : 100
      _STATISTICS_WRITING_APP: mkvmerge v80.0 ('Roundabout') 64-bit
      _STATISTICS_WRITING_DATE_UTC: 2024-01-05 00:28:38
      _STATISTICS_TAGS: BPS DURATION NUMBER_OF_FRAMES NUMBER_OF_BYTES
  Stream #0:3: Attachment: none
    Metadata:
      filename        : NotoSansTC-Regular_0.ttf
      mimetype        : font/ttf
      title           : Imported font from Untitled.ass
  Stream #0:4: Attachment: none
    Metadata:
      filename        : FakeFont_0.ttf
      mimetype        : font/ttf
      title           : Imported font from Untitled.ass
  Stream #0:5: Attachment: none
    Metadata:
      filename        : NotoSans-Regular_0.ttf
      mimetype        : font/ttf
      title           : Imported font from Untitled.ass
We can see the subtitle as a stream in the video file, but we can also notice some other interesting streams. Namely, Stream #0:3, Stream #0:4, and Stream #0:5. All of these are font files, and one of them has a suspicious name: FakeFont_0.ttf.
As a next step, we can extract the subtitle and the font files:
- subtitle:
ffmpeg -i chal.mkv -map 0:s:0 subs.srt - fonts:
ffmpeg -dump_attachment:t "" -i chal.mkv
Now that we have all the files, we just have to use FakeFont_0.ttf to display the subtitle, and we’ll have our flag.
What the Beep?
In this challenge, we get access to 4 HTML files. When we open them, we’ll see similar results: a page with a graph. The title of the graph is the latitude and the longitude for the station that recorded the graph, and the recorded sound level at the time of the event. We also know from the challenge description, that the original sound was 140 dB at the source.
At this point, I started to search for the physics of how sound gets quieter. I quickly found this website, that has a calculator, and more importantly, a formula, to calculate the sound level at a given distance, if we know the original sound level. This is almost what we needed, but after some rearranging, I ended up with a formula that I could use to go on: R2 = R1 * 10**((LP(R1) - LP(R2)) / 20)
R1: distance from the sound source (where we recorded the event)R2: distance from the sound source (what we’re looking for)LP(R1): the sound level atR1(140 dB, we know this from the challenge description)LP(R2): the sound level atR2(this is what we recorded)
The next step after this was to calculate the distances. For that, I just manually copied the interesting data points from the HTML files, averaged them, and plucked everything into the formula.
#!/usr/bin/env python3

import statistics

# from https://www.wkcgroup.com/tools-room/inverse-square-law-sound-calculator/
# Lp(R2) = Lp(R1) - 20·Log10(R2/R1)
# R2 = R1 * 10**((LP(R1) - LP(R2)) / 20)

beeps = [
    ((37.185287, -120.292548), [49.4862687673082,49.11758306247154,...]),
    ((37.232087, -120.262349), [52.879014933968996,52.54872781181507,...]),
    ((37.258453, -120.406603), [52.17321775231684,52.476372985369295,...]),
    ((37.310205, -120.352005), [55.85157188673318,55.715038053180564,...])
]

def calculate_distance(distance0, sound_level0, sound_level1):
    return distance0 * (10**((sound_level0 - sound_level1) / 20.0))

for beep in beeps:
    average_sound_level = statistics.fmean(beep[1])
    print(beep[0], average_sound_level, calculate_distance(1, 140, average_sound_level))
After I got the distances I just searched for an online tool that can visualize them on a map.
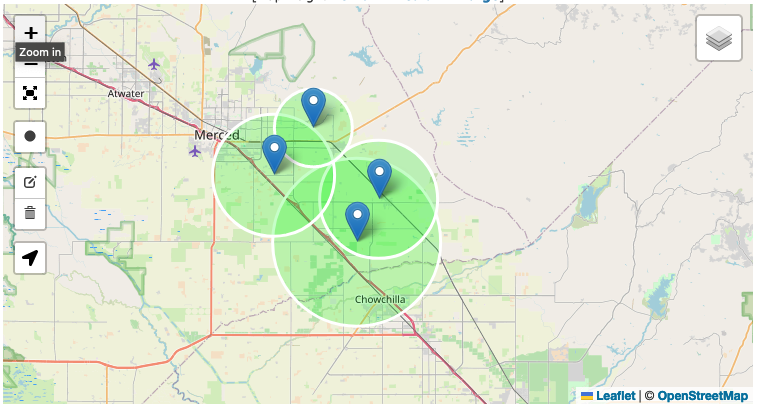
Once this was done, I just had to find the latitude and the longitude for the location where the circles intersect each other and send it to the answer checker service to get the flag.
OSINT
Away on Vacation
For this challenge, we had to find information about Iris’s assistant. At the start, all we knew was his email address (michelangelocorning0490@gmail.com).
As a first step I tried writing him an email, and I quickly got an answer from him. He said that he’s on vacation right now, but I should check his social media profiles. He also mentioned that he likes to talk about birds.
With that info in mind, I went on various social media sites and tried searching for his name. I managed to find his Instagram profile. Thanks to the birds it was easy to be sure that it was his profile, so I went through his images to see what I can found, and the flag was in the description of one of them.
Personal Breach
This time we had to find some information about Iris to pass her security questions and get access to the flag.
I started where I left the previous challenge off, on Michel’s Instagram page. Looking at the accounts he’s following we can find one called irisstein_station.
Once again, I went through her posts, and found one that mentions her mother, and also has a (broken) tagging for her. I started to search for her on Instagram, but without success, so I went on to Facebook. There, I found a profile that looked promising, so I started to read the posts and I found one that was about Iris’s birth. It contained her birthday, which was the first piece of information we needed to solve this challenge.
Elaina’s comment on this post also contained some useful information:
- Iris was born in the “best maternity hospital in Manhattan”
- she also added an image of one of the rooms in the hospital
I did a reverse image search of the picture she posted and found the website of the Lenox Hill Hospital, and with that, the second information we needed.
All that was left was to find her workplace. Since we’re talking about work, I instantly went to LinkedIn, and after a quick search I found her profile, and with that, the company she’s working for.
Czech Where?
We’re continuing our creepy obsession with Iris, this time we got a photo and had to find the street she took it on.
As a first step, I tried to see the coordinates in the EXIF data. Unfortunately, it was not present, so I had to find another way. I did a reverse image search and found a blog post containing the exact picture.
Since the post was in Japanese, I had to translate it to see if I could find any more useful information. The post was about a trip to Prague Castle and mentioned some kind of weapon exhibition, so I googled prague castle weapon museum. I found some information about a Medieval Armory, and since the pictures looked similar to the ones in the blog post, I started my search at its address.
I went to StreetView, and after a short look around I managed to find the door on the original picture, so I converted the name of the street to the format specified by the task and submitted the flag.
Closing Thoughts
These are all the challenges I managed to solve, but I’m very happy about it. I got two flags for challenges that were solved by only a handful of teams (Mokersee and What the Beep?), and with Mokersee I even got a third blood for the first time since I’m participating in CTFs.
In the end, I earned 1542 points and finished in 90th place (out of 1207 teams), which is probably my best result ever (so far).
All in all, I’m really happy with the result and enjoyed the whole competition. Thanks to the organizers, they did a great job, and I’m looking forward to next year’s competition.